Welcome, Guest. Please login or register.

Author Topic: Buying an A4000T? Things to look for.  (Read 18601 times)

Description:

0 Members and 1 Guest are viewing this topic.

Offline X-rayTopic starter

  • Hero Member
  • *****
  • Join Date: Jul 2004
  • Posts: 4370
    • Show all replies
Buying an A4000T? Things to look for.
« on: November 03, 2006, 03:47:10 PM »
So many A4000Ts have come up for sale lately, that I thought I would make a few notes for potential new buyers to consider, when assessing the completeness of the unit.

I will start with the bezel and add other items later. These pictures will go into the Amiga.Org Album too.
 

Offline X-rayTopic starter

  • Hero Member
  • *****
  • Join Date: Jul 2004
  • Posts: 4370
    • Show all replies
Re: Buying an A4000T? Things to look for.
« Reply #1 on: November 03, 2006, 04:00:41 PM »
The bezel

Here is the Escom A4000T bezel, removed from the case. Note that many people did not have an Amiga label on their bezel. I have included a scan of that label in the Amiga.Org photo album so that you can print your own.


Here is the bezel with the door open. Original Escom A4KTs were shipped with a floppy drive only (in terms of externally accessed drives), and so you should expect an A4KT to come with at least 4 drive bay covers, such as the one arrowed in this picture: (if the guy has installed extra devices such as a CD-Rom, he should still have the drive bay cover).


Here is how those drive bay covers attach to the bezel:


Note that A3000T covers are not the same as A4000T covers. They are not interchangeable.
Next, you should make sure that the bezel is structurally sound. It should have the smoked grey plastic panel on the front, and intact hinges and door catch. Here are some pictures of the hinges, which are actually small plastic rods (arrowed). These are easily damaged and tend to be the things that break first on the bezel if the owner isn't careful:


The catch is a plastic protrusion on the inside of the door that 'mates' with a black two-pronged clasp on the bezel frame:


On the underside of the bezel, you should see 6 claw clasps (red arrow in following pic) and also 3 clear plastic LED covers between the bezel buttons (green arrow in following pic). Those can come loose, it happened to me.


The other thing to look out for is scratches or prise marks on the underside of that bezel from where the previous owner may have used excessive force to get the bezel off.

I can't say that these are likely to be found in mint condition. They are usually yellowed, like mine, and there are often scratches on the smoked grey panel.

And that's what comprises a complete A4KT bezel.
 

Offline X-rayTopic starter

  • Hero Member
  • *****
  • Join Date: Jul 2004
  • Posts: 4370
    • Show all replies
Re: Buying an A4000T? Things to look for.
« Reply #2 on: November 03, 2006, 04:23:56 PM »
You are most welcome, my good man!
 

Offline X-rayTopic starter

  • Hero Member
  • *****
  • Join Date: Jul 2004
  • Posts: 4370
    • Show all replies
Re: Buying an A4000T? Things to look for.
« Reply #3 on: November 03, 2006, 04:38:31 PM »
@ Adolescent

Don't worry, my son, I will cover all the angles  ;-)
 

Offline X-rayTopic starter

  • Hero Member
  • *****
  • Join Date: Jul 2004
  • Posts: 4370
    • Show all replies
Re: Buying an A4000T? Things to look for.
« Reply #4 on: November 03, 2006, 04:43:19 PM »
The whole shebang, yes.
 

Offline X-rayTopic starter

  • Hero Member
  • *****
  • Join Date: Jul 2004
  • Posts: 4370
    • Show all replies
Re: Buying an A4000T? Things to look for.
« Reply #5 on: November 03, 2006, 09:18:06 PM »
@ Andeda

Thanks!
I don't know how many Escom A4KTs were made, but I am under the impression that there are many. They are certainly not as rare as the Commodore A4KT, which is the same machine but with a different bezel.
 

Offline X-rayTopic starter

  • Hero Member
  • *****
  • Join Date: Jul 2004
  • Posts: 4370
    • Show all replies
Re: Buying an A4000T? Things to look for.
« Reply #6 on: November 03, 2006, 09:56:20 PM »
The Case

OK, now let's see what you should look for in the case itself. I won't discuss the lid because that is a fairly obvious case component. It forms one side of the case, so unfortunately you cannot access the tower insides while the case is standing upright. You have to turn it sideways and remove five screws from the back. You can remove the case lid without having to remove the bezel (for example if you just want access to the motherboard). Here is a picture of the front of the case, top part:


There you can see the switch and LED block, and also a keylock. You should check that all the LEDs are present and that the cables and jumper blocks are present for each switch and LED. Some of these may seem useless (such as the Turbo button and LED) but they are very useful for connecting to third party boards such as SCSI controllers and Kickflash boards. The other thing that should be present is the proper floppy drive face plate and floppy itself. There should be a pair of drive rails for each bay, making five pairs in all. If there aren't five drives mounted, then the extra drive rails must be in storage. The drive rails allow for the removal of devices without a screwdriver (you squeeze the tabs towards each other and then you can pull the device out with the rails attached to it).

Here is the lower part of the front of the case:


There is a heavy plate that bulges from the front of the case. It is there to protect the vertical drive bays. It is attached with four screws that also secure the front of the drive chassis. You can also see a removable 80mm fan filter, for the case fan.

Here is a picture of the back of the case:


The important features here are the PSU with its monitor power plug and 120v/240v switch. The drive chassis has a lip that is secured at the back with two screws as indicated. You can also see the disks module external SCSI connector and the AV module ports at the back. There is usually a sticker that describes the various ports, but note that the stickers on some units show the wrong positions for the SCSI DIP switches.

Inside the case at the front:


Here you can see the drive rails and the drive chassis. Note that the drive bay enclosure with the floppy and CD-writer, is not removable like the drive chassis.

Towards the bottom:


Standard equipment is the case fan (80mm) and the internal speaker. Not shown here is the coin battery that is spot-welded to tabs on the mobo. Here the battery and the tabs have been removed and I am using a lithium battery pack instead (non-standard equipment). Check my album photos to see more info on the battery pack.

And last but not least, at the back of the case inside:


There should be six backplane covers (if the setup is original and the user has no Zorro cards with backplanes). Note that the slot where the AV module goes, does not have a case screw hole. There is a backplane plate (or L bracket) that serves to secure the AV module in place). Many users didn't get this plate. In fact I had to make one for a poor bugger in Canada  :-P

Optional extras for the case (although they were included as standard when I bought my A4KT): case stands. Check my album photos to see them. I don't regard those as essential items.
 

Offline X-rayTopic starter

  • Hero Member
  • *****
  • Join Date: Jul 2004
  • Posts: 4370
    • Show all replies
Re: Buying an A4000T? Things to look for.
« Reply #7 on: November 04, 2006, 03:53:34 PM »
The Motherboard and daughter modules

Okay, this is the heart of the machine, the motherboard. Here is the mainboard (note that this is NOT enough to constitute a working A4KT mobo):


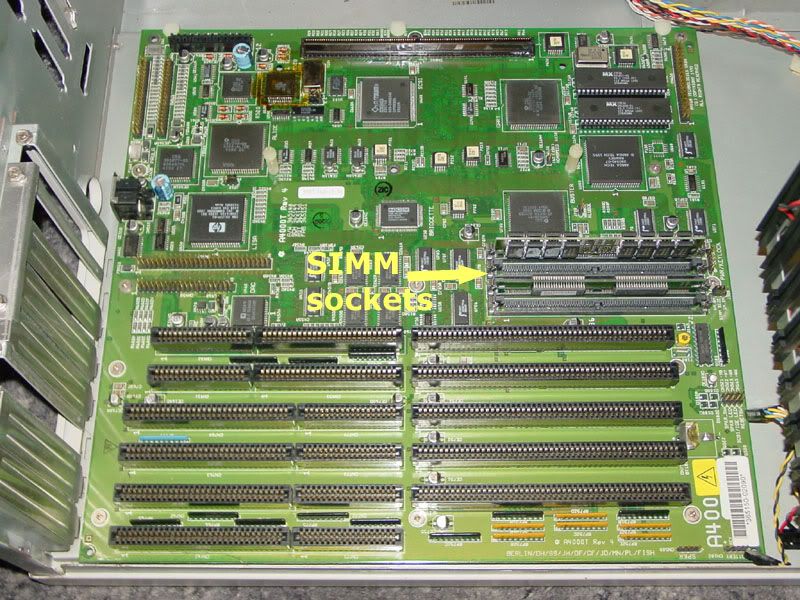
There is no daughter board for Zorro slots on the A4KT.The zorro slots are on the mainboard. There are four 72 pin SIMM sockets on the mobo, but you can only have a maximum of 16mb RAM onboard. Here I have two 8mb SIMMS.

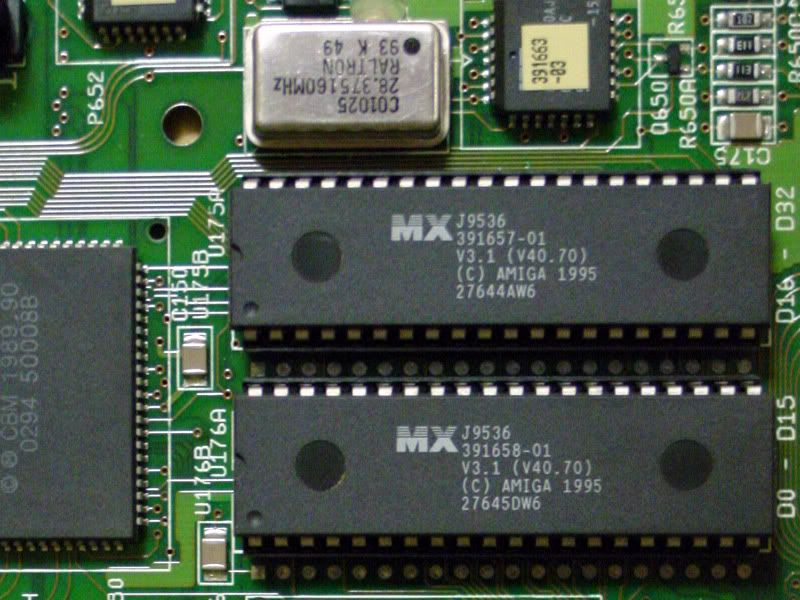
There are only three components that the previous owner may have messed around with, that are removable: the ROMS, and two oscillators. Here you can see the original 3.1 A4KT ROMs and the mobo oscillator above, at 28mHz. These ROMs are not the same as A1200 3.1 ROMs.


The other oscillator is located near the CIA chips, and is for the CPU slot, and is rated as 50mHz standard. See here:


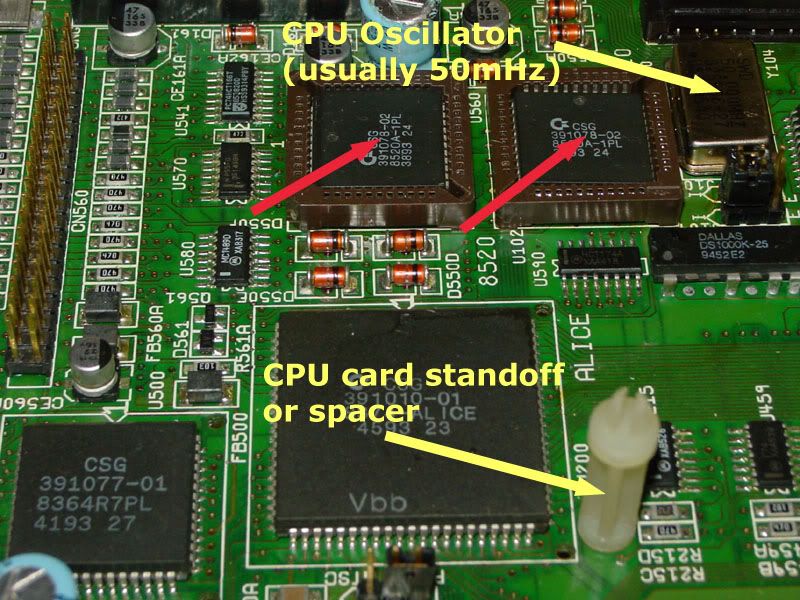
Note that the two CIA chips here are socketed (red arrows) and this is NOT standard on an A4KT. I had that done by Amiga Center in France. Standard equipment is the CPU slot oscillator and the standoffs for the CPU card, which was an 040 card by default (an A3640). Note that not all of these spacers are the same length, and using the wrong spacers can cause quite a few problems. Take this into account if you buy an A4KT with an A3640 card and you subsequently upgrade to another card eg. a PPC card.

Right, now for the daughter modules of the A4KT.


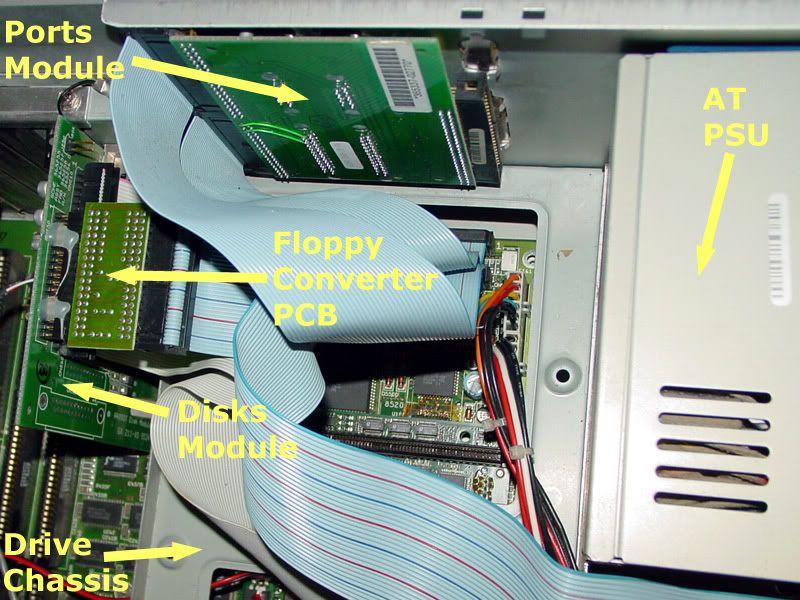
The A4KT comes with three daughter modules: the ports module, the disks module and the AV module. These are not optional extras and constitute the essential components of an A4KT motherboard. If you are buying an A4KT and the seller takes one or more of these modules away, he is not selling a complete A4KT, end of story. The ports module is mounted to the case by means of screws that attach from the outside of the case. Standard equipment are the two ribbon cables that attach that module to the mobo. Then on the left you can see the disks module. Without that module the machine won't even boot, regardless of what other expansions or accelerator card you have. That disks module has the floppy drive header and the internal 50 pin SCSI header on it. The module attaches directly to the mainboard. Standard equipment is a SCSI cable for connecting to a HD (all A4KTs came with hard-disks) and also a floppy cable. Now this is where there seems to have been some variation. My unit has a non-standard floppy drive. It isn't a standard PC drive but it also isn't a standard Amiga drive. It is an 880k drive that can only be used with an Amiga if it is connected through the floppy PCB you see there. Some users have reported getting A4KTs with 1.7mb floppy drives, without that intervening PCB, and others have received 880k drives without that PCB too. Make sure before you buy, that the floppy works. If it doesn't work, ask if that PCB was part of the original shipment.

Here is a different view of the daughter modules and here you can see the AV module:


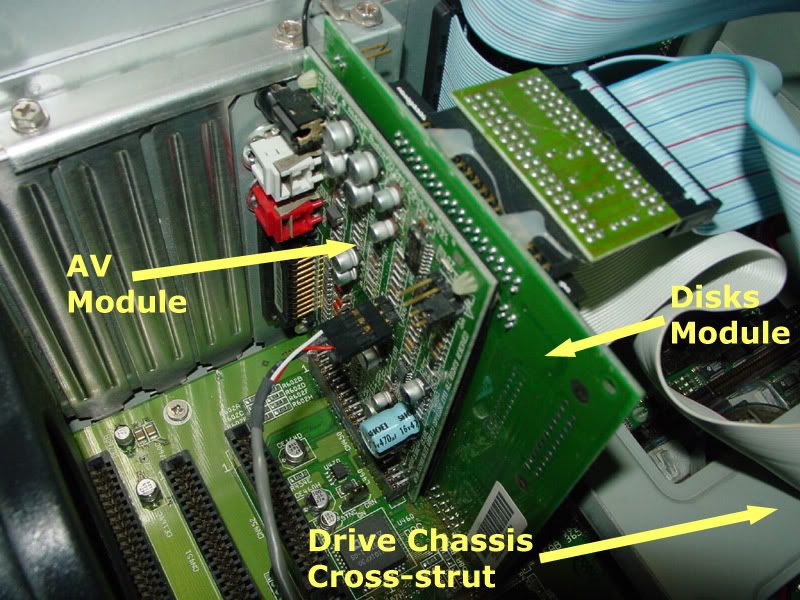
That's all self-explanatory. The only thing there that is not standard is the grey CD audio lead that attaches to the AV module. I added that when I got my CD-writer. Also in that image you can see how the L bracket secures the AV module.

Those are all the components that constitute an A4KT motherboard. In my case it means the mobo, three daughter modules and the floppy converter PCB, and all the associated cables. For more info on the daughter modules, see my pictures in the photo album. I have detailed images there.
 

Offline X-rayTopic starter

  • Hero Member
  • *****
  • Join Date: Jul 2004
  • Posts: 4370
    • Show all replies
Re: Buying an A4000T? Things to look for.
« Reply #8 on: November 04, 2006, 09:09:03 PM »
@ Erol

Could you please post pics of both your disk modules, so that I can compare them to mine. See mine here:

http://www.amiga.org/gallery/index.php?n=1674

It is a revision 1 module. When I bought a spare from Vesalia, it was also a revision 1 but came without a backplane.
 

Offline X-rayTopic starter

  • Hero Member
  • *****
  • Join Date: Jul 2004
  • Posts: 4370
    • Show all replies
Re: Buying an A4000T? Things to look for.
« Reply #9 on: November 06, 2006, 08:11:21 PM »
And now the odds and ends

Well, the keyboard and mouse are not really odds and ends, but you aren't going to hang yourself if you don't get the original keyboard and mouse. Here they are:


The keyboard just says 'Amiga.' It has the large connector, which means if you buy a spare keyboard for the A4KT and you don't have a converter, you should just buy an A2000 keyboard. Of course if you got all the things that I got with my A4KT, you will have a converter already.


Above you can see the Amiga RGB to PC VGA converter. This is not a scandoubler or flicker fixer, you still have to choose a 31kHz mode that the VGA monitor can use. In the middle you can see the keyboard converter (if you want to use an A4000D keyboard on your A4KT) and on the right you can see the two keys for the keylock.

There was also an A3 sheet that details the components of the Enlight case and how they fit together. This does not show an Amiga bezel. Here are two scans of that sheet, front and back. If anyone wants high res images of that they can PM me.


Offline X-rayTopic starter

  • Hero Member
  • *****
  • Join Date: Jul 2004
  • Posts: 4370
    • Show all replies
Re: Buying an A4000T? Things to look for.
« Reply #10 on: November 06, 2006, 08:21:58 PM »
Manuals and software

My A4KT came with the following manuals and disks:


The manuals came in this box:


There are six manuals and a quick reference booklet which makes 7 manual items just for Amiga OS 3.1 that ships with the A4KT. Then there are three other manuals for the free software that accompanied the A4KT.

Workbench 3.1 for my A4KT was supplied on 6 floppies (880k). Here are the labels of those disks:


These are not the same as A1200 Workbench disks. Here are the labels for the free software that came with my A4KT:


All the disks are 880kb. In my case there were 22 floppies in total, and 10 manuals that accompanied the Amiga.
 

Offline X-rayTopic starter

  • Hero Member
  • *****
  • Join Date: Jul 2004
  • Posts: 4370
    • Show all replies
Re: Buying an A4000T? Things to look for.
« Reply #11 on: November 06, 2006, 08:51:38 PM »
I took 52 photos / scans for this thread, so I hope all you fukkas are grateful  :-P
 

Offline X-rayTopic starter

  • Hero Member
  • *****
  • Join Date: Jul 2004
  • Posts: 4370
    • Show all replies
Re: Buying an A4000T? Things to look for.
« Reply #12 on: November 07, 2006, 12:46:14 PM »
@ Oli-hd

Glad you like the pictures. I have a picture and matching X-ray of the A4KT mobo: I will see if I can locate those and post them here.

Flux mess: ja, been there, done that. Actually, it was Amiga Center in France who went there and did that. Some of the pictures in the thread are from before I got my CIAs socketed, and some are from after. But you are right, it was darned ugly before JJ got hold of it.
 

Offline X-rayTopic starter

  • Hero Member
  • *****
  • Join Date: Jul 2004
  • Posts: 4370
    • Show all replies
Re: Buying an A4000T? Things to look for.
« Reply #13 on: November 07, 2006, 01:03:37 PM »
Well you are in luck my son, I found those pics. Here is the mobo and the X-ray of the mobo:


And here is a closeup of the ROMs, Gary, Ramsey and Buster:


These images were taken before the CIA replacement.
 

Offline X-rayTopic starter

  • Hero Member
  • *****
  • Join Date: Jul 2004
  • Posts: 4370
    • Show all replies
Re: Buying an A4000T? Things to look for.
« Reply #14 on: November 07, 2006, 01:08:43 PM »
Technical info about that X-ray:

The proper term for it is radiograph. That one was produced from a 35 x 43 cm film in an X-ray cassette. It then gets developed in a black and white process. That blue tint you see there is the base tint of the cellulose layer of the film.

That is one big negaitve !!

Soon I will have access to a medical-grade radiographic digitizer and I will try to digitize my films properly. I don't know anybody who has a transparency scanner at home that can handle a 35 x 43 cm negative  ;-)